I’ve really started taking advantage of the YouTube channel I started a while ago. If you want to spend some time there, please like and subscribe. I’m hoping to some day get enough views and subscribers to monetize the channel so I can make some extra cash for supplies for the cabin. Here’s the link to the channel. https://www.youtube.com/user/ajaiart/bohemiantiger
Some of the videos are about TMBR and the trials and tribulations of building on a budget. Some of the videos include my art and the process for creating. I hope that somewhere along my journey, I can help someone else that is facing some of the struggles we all have to work through as being human. Even if that is just learning how to laugh at yourself.
I am going to do as much of the work as I can to get this cabin/cottage done myself. I did outsource the foundation, framing and septic. It may take a few years to get it all done. I’m doing the work myself and by myself so every project is lesson in process and coming to terms with the fact that I don’t have a clue what I’m doing…lol
That being said, I don’t expect anyone to think my videos are a real “how to” but more of an expression in process and perfection aren’t really the answer. The answer is just keep trying.
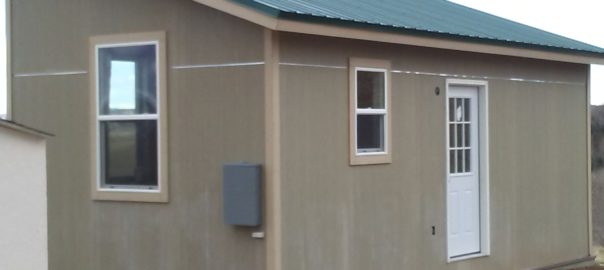
This is a peek at the cabin insulation…Love and hugs!
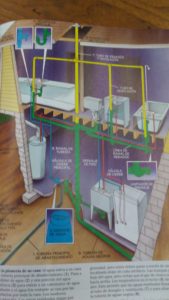
I wasted months making excuses. I watched every plumbing how-to video on YouTube and read every how-to book on the subject I could find (including one in Spanish…at least I looked at the pictures) because it was the only one I could find at my local Home Depot. I talked to friends and folks on the street trying to get some insight into how to go about doing the rough-in plumbing on the cabin at TMBR (TM…a whole ‘nother story! Yes, I changed the name formerly known as TM to TMBR) and I still don’t have the knowledge or self confidence to do the work myself.
I mean really, it took forever to get the courage to bypass the propane tank on the RV. It’s time to face reality here. I need to get this done to move forward. I don’t have the time or skills to do this. I know! I can do anything I set my mind to! But you know what? I have limitations too! Sometimes, it just makes sense to pay a professional to do the work.
I guess it really came into full focus when I was going to go up to TMBR to start cutting holes in the floor and my kitchen sink at the house broke. I spent all day fixing it and realized I had caused the problem myself. When I replaced the garbage disposal a couple of years ago, I put one pipe in backwards. I didn’t even realize there was an up or down to it. granted, it did last 2 years before it gave way…but the point is, if I want the cabin rough-in done right…I’m NOT going to do it myself!
I will take the chance with the fixtures after everything else passes inspection and I know even if I make a mistake, it will be something I can fix relatively easily, just like the sink but making it past the inspectors for the LP lines and everything else is just too important and can hold up the rest of the project beyond what I am willing to wait right now.
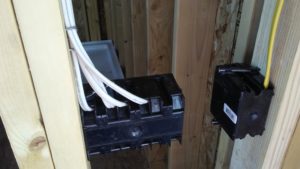
Electrical Rough-in
I paid for the electrical rough-in already. I’m learning about so many other things right now, there just isn’t enough bandwidth to poke any more information into the space between my ears.
Time is also valuable and lately I just haven’t had much. I’m fighting with myself to create art. When I get home from work, I’m exhausted and just want to veg. Lately it’s been more about just forcing myself to create anything. I’ve been doing some crafting like making soap because I don’t have to think really hard or be available emotionally to handle what comes out of the brush strokes like I do when I’m painting. I’ve been needing more and more time to catch my breath and really need this cabin done so that I can just refill my bio-batteries and breathe.
Citrus Forest – Coconut and Olive Oil Soap by TMBR
Too many projects may look like a busy, full life…for me it has become a stagnant life. Half started this…gonna start that…I’ll get to it when…all the things that were in full steam mode a year ago have halted. I have halted.
Maybe it was the feeling of failure when I was laid off last summer. Maybe it’s because I still haven’t faced or dealt with the emotions of losing my mom, 2 aunts, 2 dogs a cat and a job all within 14 months. (May 1st this year will be the 2 year anniversary of mom passing.)What ever the reason…The fear of failure has set in. The need for a nap has taken over and I just want to find the fulfillment of finishing something that is important to me.
I have a mess of stuff I need to get rid of anyway. (I still haven’t cleaned out my studio of all the things that moved in before, during and when mom passed. I haven’t even started to get rid of stuff.) I need to sell stuff that is holding me back to make room for things that can take me forward. I only have a few things of actual monetary value. Not much value, but maybe enough to pay the plumber.
Advertisement…
That may be a big part of it too. Most things I own whether mine or my moms, have no $$ value. I’m always fixing what was broken or mending what I think has just a bit more life left if I just sew up one more hole. I’m the queen of Jerry rigging and proud of it for the most part…but I don’t want to sew up another hole at TMBR. I want it fixed right the first time.
I’ve learned a lot about plumbing this winter. At least I can say that for all the research I did trying to get to a point where I could do the rough-in myself, I know that I have enough knowledge now that if in the future something does break, I can fix it. But for now…I’m selling my “Plumbing for Dummies” to pay for a plumber!
*Disclaimer…I am not a professional plumber or licensed in any way. If you blow yourself up doing this…it’s not my fault! If you are not confident in your ability to do this yourself…don’t do it yourself and pay someone with the skills to do it safely.
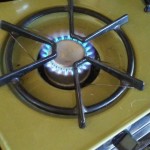
Coffee made on an RV stove
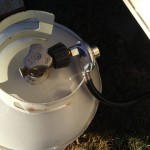
I have an old RV that I have parked at Tiger Mountain and am not able to get it to a location to refill the LP tank so that I can use the appliances inside. I decided the best way to deal with this is to bypass the onboard tank so that I can use a standard gas grill tank.
I bypassed the onboard tank so I could use a standard propane grill tank for my RV appliances
After not finding the answers to my questions after tons of YouTube videos and asking friends and family what to do…I went to talk to the local hardware store staff. Finally…I have the answer and was able to do the work myself! I figured I would share this with my followers so that maybe…just maybe what took me a few hurdles will be much more simple for you if you need the info.
propane gauge
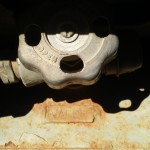
First things first! make sure your onboard tank is empty. Then, turn it off to make sure you are not cutting the pipe while there is gas in it. Some old tanks have a gauge so you can see if it is empty. Some don’t, so use your best judgement on how to be sure it is empty.
Be sure to turn off the propane
I wasn’t sure if my gauge was accurate, so I just used it up until it was obvious that it was empty and then left it “on” with all windows open in the RV for a few minutes after I made my last pot of coffee to be sure the lines were empty.
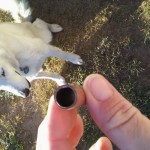
Once I was sure the lines were empty, I turned the valve to “Closed” and used a pipe cutter
pipe cutter
to take a small section of the pipe out so I could use it as a guide when I went to the hardware store to find the parts needed.
The pipe section I removed with a pipe cutter
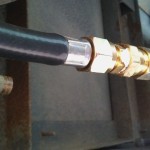
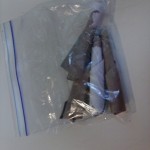
When working with gas lines, you will need a compression connector that can attach to a thread-less copper tube. Because my RV is a 1977, it has an older copper tubing that is no longer available at most hardware stores. I was a bit worried that I wouldn’t find a 1/2″ fitting that would work and was prepared to have to make due with a retrofit of some type. Luckily for me, the thickness of the tubing is all that was really different. the advantage to using the compression connection is that it will fit the outside circumference and the inside will not make that big of a difference in the LP flow.
compression connector and flare valve
I also had to pick up a 1/2 to 3/8 flare valve so that I would have a place to thread the propane hose connector. Putting it all together was pretty easy to do. The biggest thing is make sure you tighten the fittings and check for leaks with a soap solution to be sure you are well connected.
RV stove burner after onboard propane bypassPlease, if you have concerns or are not comfortable doing this yourself…have a professional do the work for you. It may cost a few bucks but that is well worth your safety and sanity!
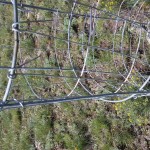
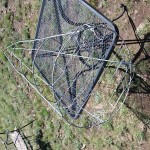
I was lucky enough to get some free tomato cages and decided that I would use them to make a fence. I wasn’t quite sure how to do it then, so I started playing with the idea of a gabion. Gabion is basically rocks and some kind of wire mesh and you can use it to make everything from bench seating to retaining walls. I started playing with that idea and created a bar for my fire pit first just to see how it worked. I Incorporated some of the things I learned from that into using these tomato cages to make fence posts. I’m going to use barbed wire to connect them all but this is basically what I went through to create the Caged system to hold the rocks. It’s a tomato cage which has a fairly large hole between the wires so I use some additional mesh wire mesh to kind of supplement the tomato cage. The tomato cage just becomes the actual structure of it and then the rest of the mesh just helps hold the rocks in.
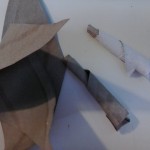
I’ve been working on a bunch of recycled/upcycled arts and crafts lately to get ready for the sidewalk show in Aurora this year. It really got me thinking a lot about the mass amounts of reusable things that so many people throw away. I made this chess set from a couple buckets of leftover parts and pieces that I bought from yard sales and scraps that folks were going to throw away.
I see so many things abandoned and forgotten by folks…things thrown in the trash that could be used again rather than thrown in a landfill…Not that I want to bring it all to my house and turn my place into a landfill, but a little bit of thought and a few minutes of your time could save the world from becoming one big landfill. You don’t have to turn everything into a work of art…sometimes just being a little creative you can think of ways to reuse what you use.
Here is an example: I like to go camping a lot and I also have a fire pit at home that I use as often as possible. You know those little cardboard tubes that hold your roll of toilet paper? Well…next time you are about to throw them in the trash, take a moment (maybe while you contemplate the next roll of toilet paper) to tare it open and re-roll it into a small roll and put it in a recycled baggie to take on your next camping trip as a fire starter…
tp rolls
re-roll the tp rolls into smaller rolls
reuse the baggie from an onion or other food item
recycled tp rolls in recycled baggie
It gets a bit crazy when you think of how many people are in the world and then think of how much stuff they throw away…I found this great little population clock that shows the world population…that’s a lot of toilet paper! And, it’s a lot of other things that could be reused or recycled. If you come up with a great recycled/upcycled project let me know at https://www.facebook.com/ILikeAjaiArt
Ok…I know, this is supposed to be about art or the process of being an artist…well…I’m an artist and I still have to do house work and fix stuff around the house and studio so this fits!
I’m getting ready for the holidays and with that comes the dreaded deep cleaning that most folks do to make sure the most persnickety of guests doesn’t leave whispering under their breath that your house was a mess! This is particularly important for folks like me with pets and problems with pet hair getting down into the heater vents…
I was changing out my vent filters when I realized…I MUST SHARE MY HOUSE HACK WITH THE WORLD! Why? because it works and its cheap and it saves time and money and somebody else out there probably doesn’t know about it…maybe I’m wrong…I might be the last to know about this…but anyway! Here it is! To watch the video… vent-scrubby
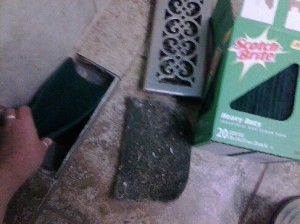
If you have trouble with the video, I’ve added a still pic to show you how it’s done. And here are some basic directions.
Buy some Scotch Brite scrubby pads.
Vacuum out your heater vent and use one of the scrubby pads to clean the vent until it sparkles…
After the first time you clean the vent you won’t need to clean your vent anymore!
Take another scrubby pad out of the box and place it in the vent hole!
Put the vent cover back in place.
The kids toys, pet hair, dirt, dental floss, candy wrappers and whatever else might have landed at the bottom of your heater vent and hard to retrieve is now trapped in the scrubby and easily removed! And…the vent works very well and the air still flows thru with ease…